The management tool allows CHAI managers to add patients and users as well as controlling which patients belong to each team and which users can work with those teams. Additionally, you can see overdue tasks and download form entries individually or in bulk for each patient.
(Patients are referred to as clients in the management tool )
How to Access the Management Tool
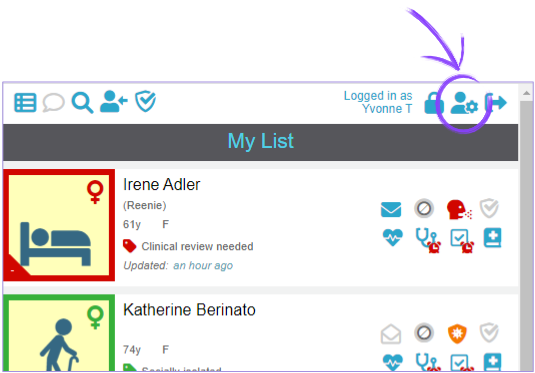
After logging into CHAI, you can access the management tool by clicking on the User Management Icon at the right-hand side of the header.
Once you reach the management tool, you can bookmark that page if you want to go there directly in the future.
You can return to CHAI by clicking on the logo at the bottom right of the footer.
Note: The management tool organises your users and clients into a structured group of teams. Ordinary users may be granted with team or group manager roles to assist with management.
View the following pages for a more extensive explanation of these structures that are not covered in this guide:
Initial Setup for New Groups
If you are a group manager, the very first time you use CHAI, you will be directed to the management tool to set up your group.
You will be presented with a setup wizard which will guide you through the six steps to creating your group. You can just follow the instructions and click next to progress.
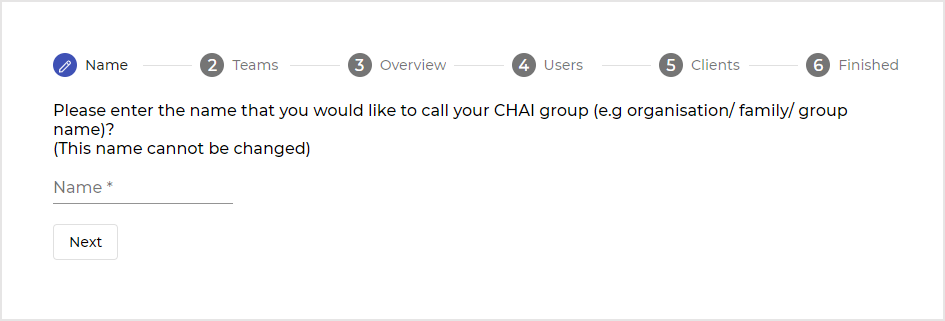
Group name
Enter what you would like to name your CHAI group, usually your establishment name. (This name cannot be changed.)Set up your initial teams
Learn more about your group structure and teams here.Overview
Ensure you are happy with the name of your group and initial teams before committing to creating your group.
Start adding users
Enter your colleagues’ names and email addresses here to add them to their teams and to send them an invitation to register.
You can skip this step for now and complete it later.Start adding patients
Create client records and assign them to one or more appropriate Teams.Finish.
Management Features
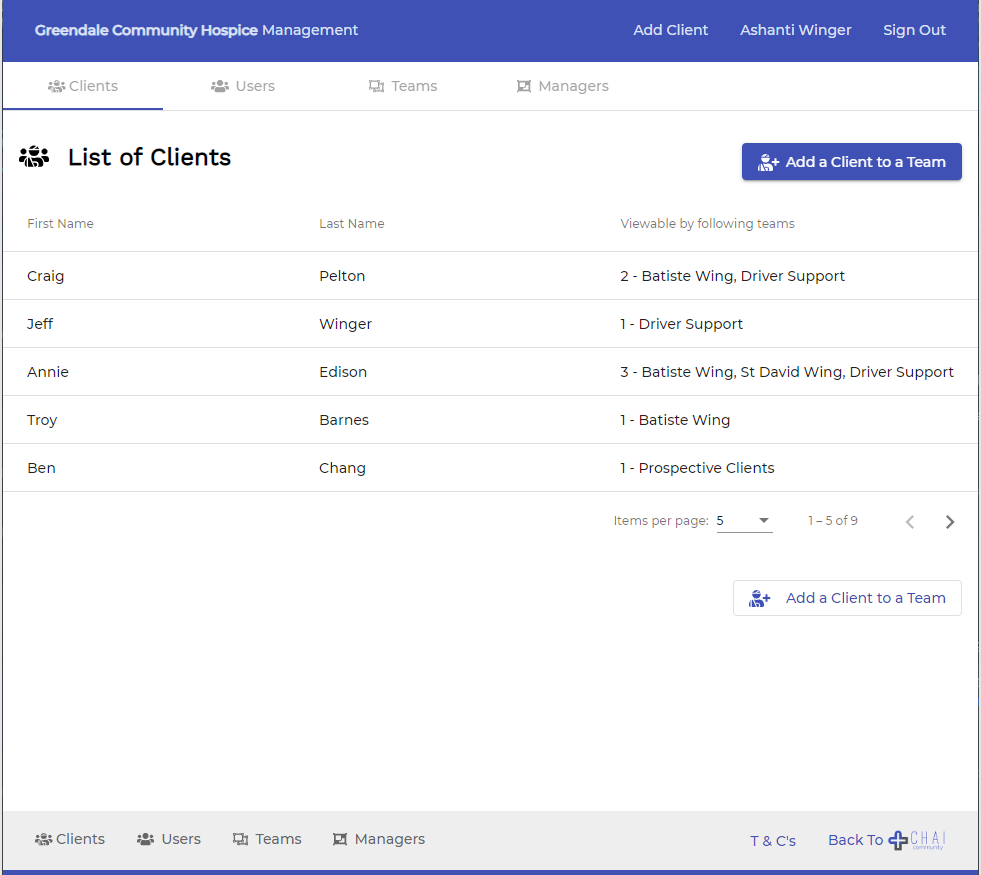
The navigation bar across the top of the screen allows you to access the four main areas of the management tool: Clients, Users, Teams & Group Managers
Manage Patients / Clients
Users are able to view a list of the patients in their team(s) in the “patients/clients” tab. All patients in the group will be displayed for the Group Manager . By default, the list shows 5 names per page, but you can change this with the drop-down menu at the bottom of the client list.
Add a Client
Add a new client from the Client page, by clicking the “Add a Client” and follow the on-screen instructions to create their record and assign them to the appropriate teams..
Only CHAI Group Managers or Team Managers can complete this action.
Remove / Discharge a Client
A Team Manager can remove/discharge a client from their Team and a Group Manager can discharge them from all Teams.
Select the relevant client and then click on the crossed box on the right to remove them from a Team.
Readmit a discharged Client
A Client is considered discharged when they have been removed from one or more Teams but their record still exists and is still accessible to the Group.
To readmit a Client, a Team Manager or a Group Manager needs to search for them and add them to the relevant teams.
Step 1 – Begin Searching
Enter the CHAI and click on
the Search icon at the top of the page.
Step 2 – Search Details
You don’t have to fill all of the details in the search form, but the more information you use, the more likely it is that you will be able to pinpoint the correct client.
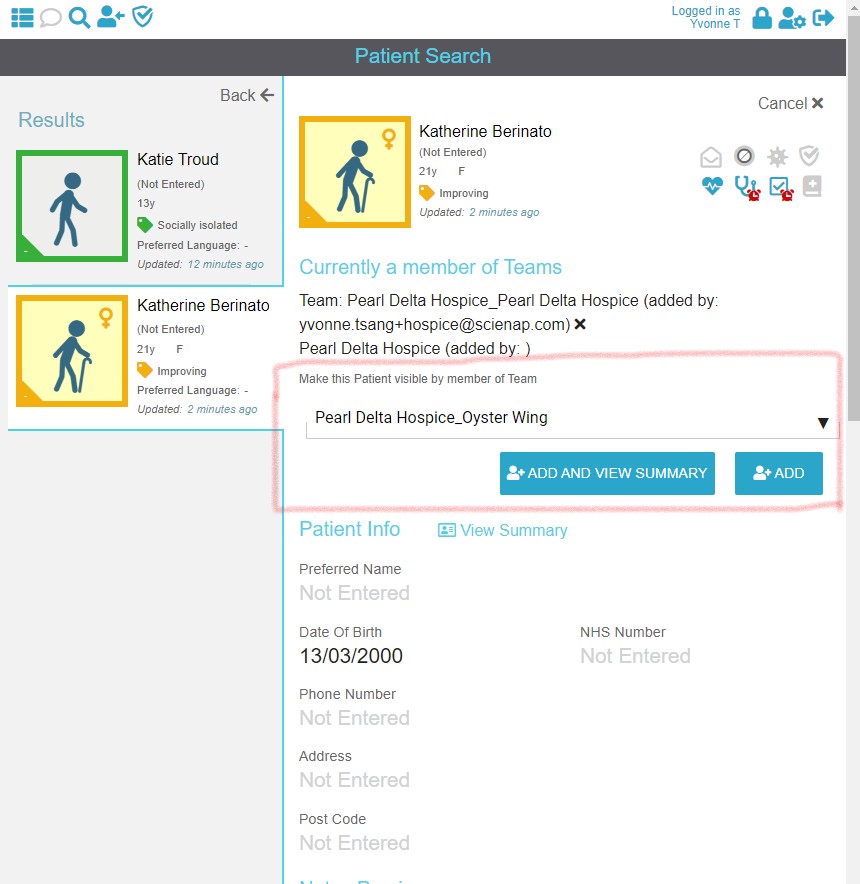
Step 3 – Choose the Client
After clicking the Search button, a shortlist of clients that match your search criteria will appear on the right. Click on the one you want to view.
You will be shown more details on that Client. You can easily switch to the other results on the left.
Step 4 – Choose a Team
When you have found the correct Client you can use the drop down menu (highlighted in the screenshot) to a select a team.
Step 5 – Add the Client
Click on one of the “Add” buttons.
“Add and View Summary” will take you directly to that Client’s Summary page after adding them to the selected team.
Note: If you are unable to use the search function. Ask your team manager to make sure that this ability has been activated for your account.
Step 6 – Create a copy of the original Admissions Record
Go to “Forms & PDFs” in the side menu and select the Admissions From. Scroll down and select print. Download the PDF.
Go to Patient Notes in the Client’s Summary Page. Create a note and attach the Admissions PDF.
Delete the downloaded PDF from your device.
You should do this before making any edits to the Client’s Admissions details since they will overwrite entries from the previous admission.
Delete a Client
A Group Manager can entirely remove a client and erase their record from the database by deleting them.
Click on the relevant client to view their details page and then click on the Delete Client button at the foot of the page.
Note: This action is irreversible.
If necessary, please ensure that you have an archived copy of the client’s record before continuing with this action.
Manage an Individual Client
You can view and edit a single client’s details by clicking their name if it appears in the client list page. If their name does not appear, ask another manager to check if this user is a member of one of your teams.
The upper portion of this page will provide basic information about this patient and their overdue tasks.
The lower portion of this page has a secondary navigation menu that allows you to switch the focus of detailed information on this patient:
- Teams
- Tasks
- Forms
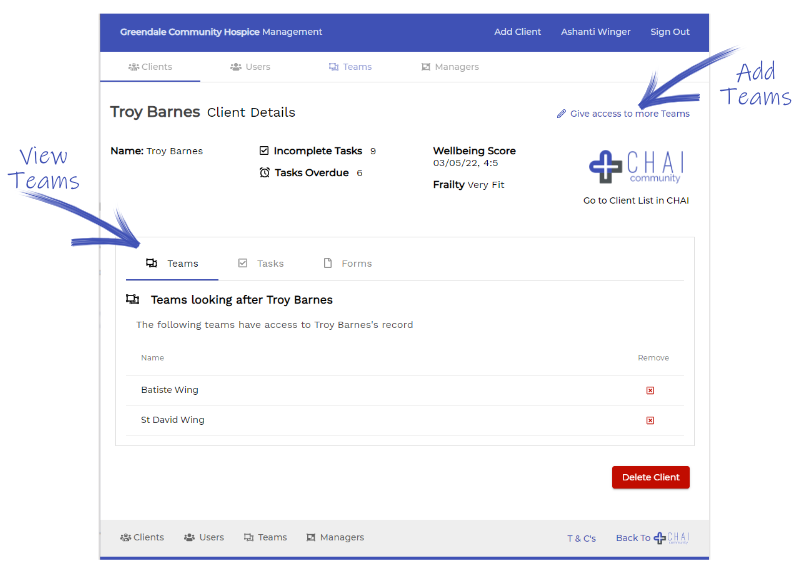
View teams for this client
On this page, users can view which teams a client belongs to.
Team managers and group managers can add and remove this client from the team lists.
- Add client to a team by clicking on the “give access to more teams” button and following the on-screen instructions
- Remove this client from a team by clicking the red cross next to the team name.
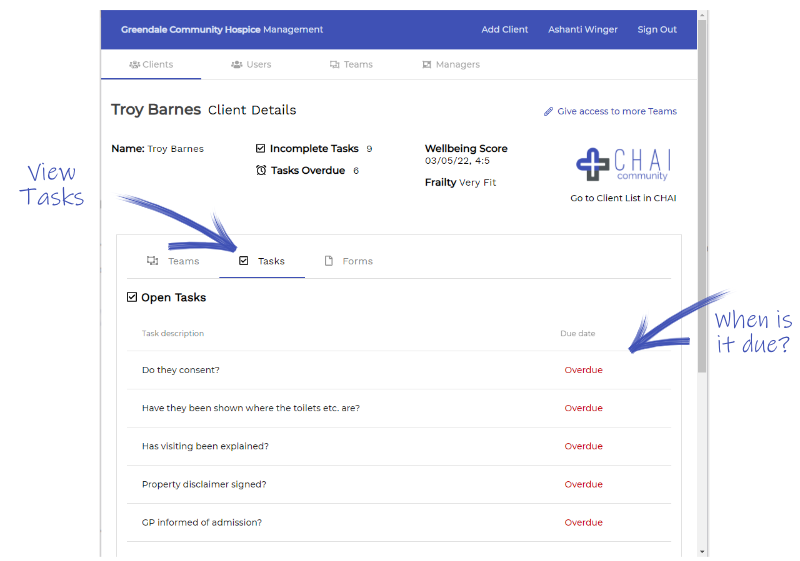
View tasks for this client
On this page, users can click on the “Tasks” tab to view the client’s current active tasks.
They can see the task description and when it is due.
Overdue tasks are prioritised at the top of the list.
Completed or archived tasks are not displayed in this list. To see these, view the client’s notes in CHAI .
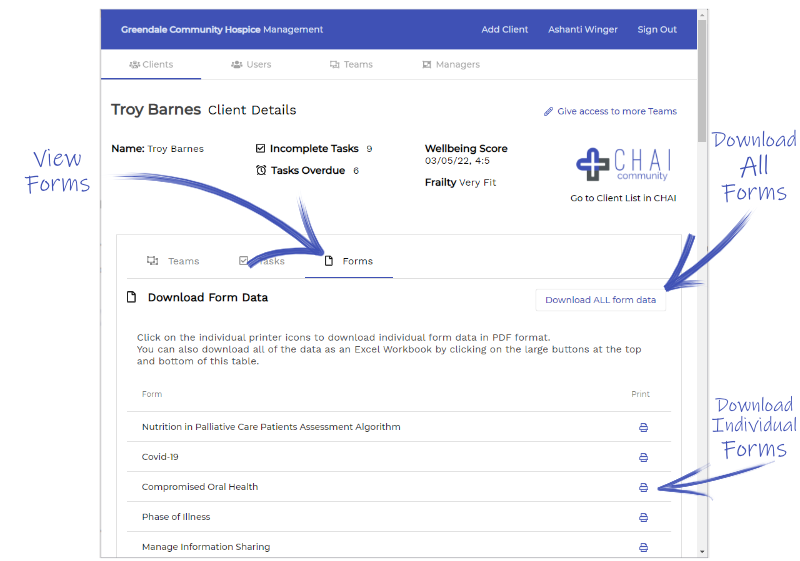
Download collated form data for this client
On this page, users can click on the “Forms” tab to view the list of all forms and associated downloads.
Click on the individual printer icons next to the form names to download individual form data in PDF format.
You can also download all of the data as an Excel Workbook by clicking on the large buttons at the top and bottom of this table.
Note: An individual form will have a link to a downloadable pdf even if the patient has never recorded entries for that form. The download will produce a pdf file with no details. As soon as a patient has created their first entry or added to their forms, the downloadable pdf will be updated.
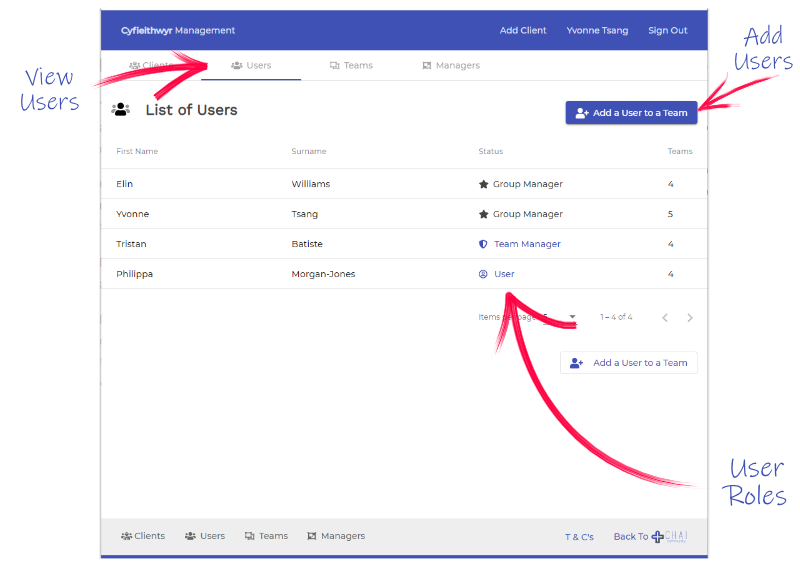
Manage Users
You will be able to view a list of the users in the “Users” tab.
The list shows the users’ names, the number of teams they have been assigned to and their highest user role. For more details about user roles, see this page.
By default, the list shows 5 names per page, but you can change this with the drop-down menu at the bottom of the client list.
Add a user (to your teams)
You will not be able to create a new user account for another user. However, if you are a Manager, then you can add users to their appropriate teams.
Click on the “Add user to a Team” and enter the new user’s name and email address and select which teams you wish to add them to.
If they have an existing, verified account, they will automatically be added as a user.
If they have not created an account yet, you can still enter their details, and they will be added to your teams after they go ahead with registration and verification.
Remove a user (from your teams)
You will not be able to delete another user’s account, but depending on your account status, you may remove them from certain teams. If you are a group manager, then you will be able to remove them from the group altogether.
Select the relevant user to view their details and then click on the crossed box on the right to remove them from a Team. Alternatively you can click on the red “Remove user from group” button.
Manage an Individual User
You can view and edit a single user’s details by clicking their name if it appears in the client list page.
If their name does not appear, ask another manager to check if this user is a member of one of your teams.
The upper portion of the page provides basic details about the user, their name, e-mail address, their highest user role level and controls that allow you to grant them with further permissions.
The lower portion of the page lists which teams this user is a member of, and the user’s role in each team.
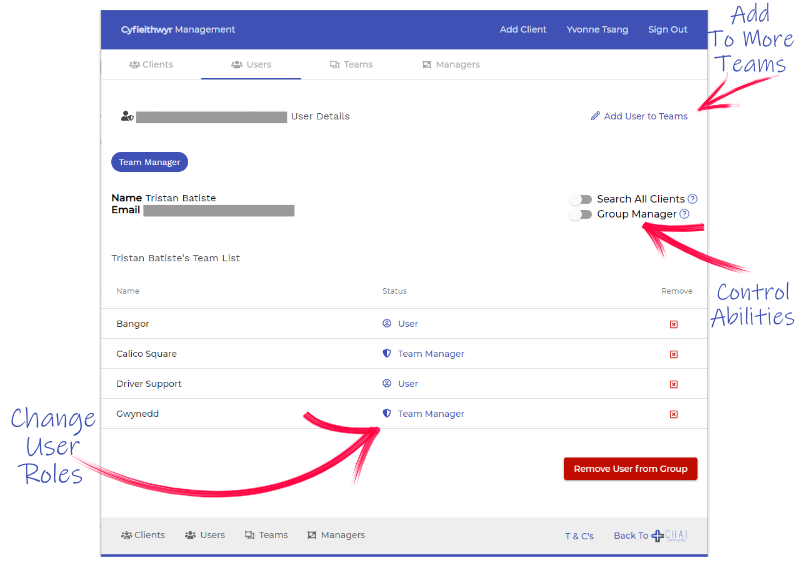
Add this User to More Teams
Click on the “Add user to teams” button in the top right, then select the relevant teams.
Remove this User From a Team
Click on the crossed box on the right to remove them from that team.
Enhanced Permissions
Upgrade to Team Manager
By default, new users are ordinary Users for all of their teams. You can upgrade their role to Team Manager by clicking the User Icon next to the relevant team names.
Upgrade to Group Manager
By default, new users are ordinary Users for all of their teams. You can upgrade their role to Geam Manager by using the group manager toggle in the top right of their profile.
Note: If you are the only group manager, you will be unable to turn off this function for yourself. The group must have at least one group manager.
Revert to Ordinary User
You can revert a Team Manager back to an ordinary User for a team by clicking the Team Manager icon next to the relevant team name.
Search for clients
By default, new users are not allowed to perform a search for clients. You can turn this ability on and off for a user by using the Search Toggle in the top right of their page.
Manage Teams
Manage the list of teams by tapping on the “Teams” tab in the header.
Your community group can be divided into any number of Teams. Allocating clients to appropriate support teams will help to limit the number of people who can see your client’s personal data to as few as necessary to function. A client can be in more than one team, allowing different teams to access their file.
You will see a full list of teams here, beside each Team name, you will see the responsible Team managers, along with the number of users and patients it has.
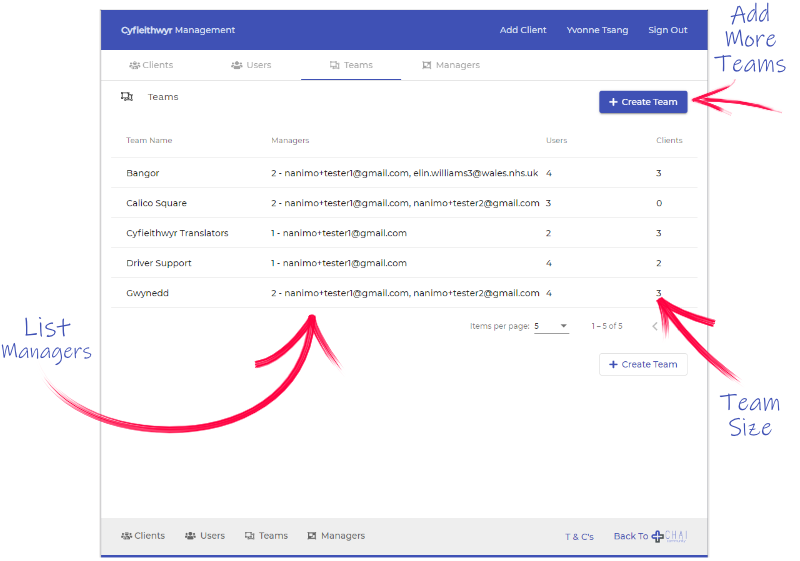
Create More Teams
Click on the “Create Team” button in the top right, then enter the new team name with an optional description.
Delete Teams
You will need to click on the individual team to view it in detail. Then click on the “Delete Team” button on the bottom right remove it fromthe group.
Manage an Individual Team
To manage an individual team, view the teams list from the “Teams” tab in the header, then tap on the relevant team name.
An individual team’s page is split into three portions, the basic details, list of users in the team and the list of clients in the team. Any users in the team is able to view and edit the CHAI record of all clients in the team.
Note: Other users may also be able to view the record for a client in this team if they both belong to another team.
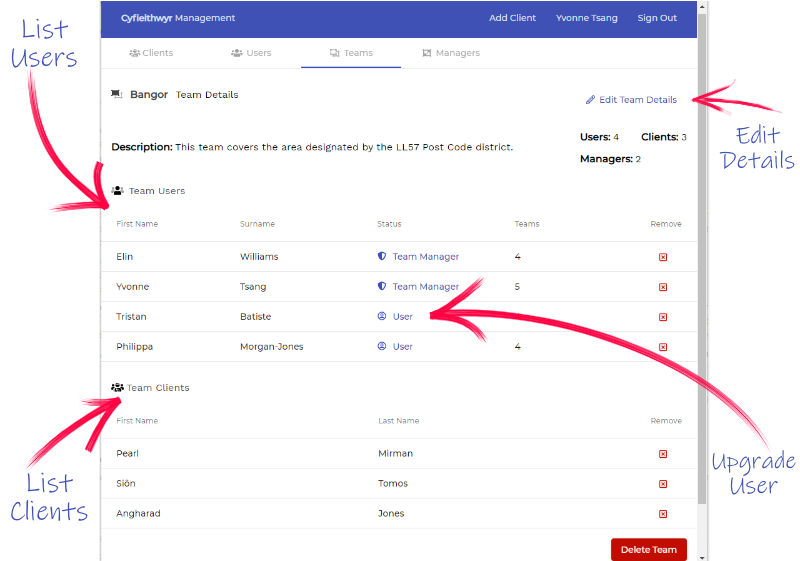
Edit the Team’s Details
You can edit the Team’s description by clicking on the Edit Team Details button in the top right corner. Team names cannot be edited.
Add Users & Clients to the Team
You will need to do this via the individual user or client’s page. Go to the “Users” or “Client” tab as appropriate, then click on the desired person’s name.
From that page, you just need to click on the “Add to teams” or “Give access to more teams” button in the top right corner.
Remove Users & Clients from the Team
On the team page, you can simply click on the Red Cross button aligned with the name of the person that you want to remove from this Team.
Add a Manager to the Team
If they are already user in this team, they will appear in the list alongside their user role. Tap on the highlighted role to upgrade them to a manager for this team.
Remove a Manager from the Team
Tap on the “Team Manager” role next to the user’s name to downgrade them back to an ordinary user .
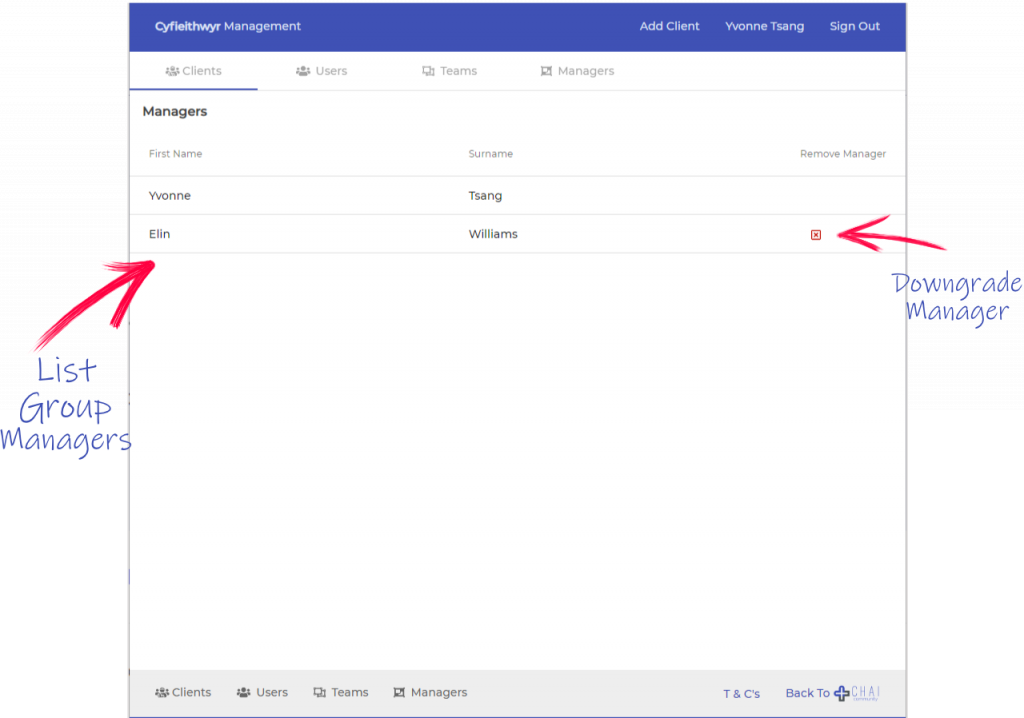
View Group Managers
Use the “Managers” tab to view the list of Group Managers, users that are only Team Managers will not be listed here.
Group Managers are users that can manage all Teams and have Client Search permissions.
Add Group Managers
To promote another user to a Group Manager role, you will need to view that user’s details page. In the top right of that page, you can toggle their Group Manager status.
Their list of teams and roles displayed will not be changed.
Remove Group Managers
To revoke a Group Manager’s role back to their previous status, you just need to click the red cross next to their name.
Their previous Teams and roles within those teams will be reinstated.
Note: You will require another Group Manager to revoke your own Group Manager status.
If you are the only Group Manager, then you cannot abandon the role before appointing at least one other Group Manager.