
Edit individual Clients
Record a check-up via phonecall, visit or other contact
Each time you assist a patient, you can record your interaction with them in the Contact Log , where you can save information such as their general wellbeing, Covid-19 symptoms and more.
Where to find it
The quickest way to reach it is to click on the Contact Log icon in the patient’s Banner , alternatively, you can find it alongside the other forms in the Assessment Tools .
Full step-by-step details about recording your visit:
Change the Covid-19 Status
You can reach the patient’s Hosuehold Covid-19 Status page simply by tapping the Covid-19 status icon in their banner.
There is also a link into that form in the side menu of the Patient’s Summary Page .
See full step-by-step details about changing the Covid-19 status here:
Tip: It is important not to mix up the Patient’s Covid-19 Symptoms with their Household Covid-19 Status (see also “How do I record if a person has Covid-19 Symptoms?” in the FAQ).
The household status is intended to reflect the most serious situation within a household recognizing that a household could have multiple occupants.
Complete a Care Plan
You can reach a person’s Active Care Plans simply by tapping the Care Plan Icon in their Banner .
You can also reach these in the side menu of the Patient’s Summary Page .
See full details about completing a person’s Active Care Plan:
Add to Admissions Information
When you are looking at a Patient’s Summary Page , click on the Admissions link in their Side Menu .
For a more detailed step-by-step set of instructions, go to the page on How to Add to Admissions Information .
Manage Information Sharing with a Third Party
Simply and securely share your patient’s data with their GP or their family.
- The data can only be accessed by using a security passphrase. These are generated for you in the app.
- Manage and control who has access to the data.
- The data is at the recipient’s fingertips and will be up to date for as long as you or the patient lets them have access.
Handle a medical emergency
For any emergency call 999 immediately.
Follow the advice of the ambulance crew.
In an emergency, you may provide ambulance control or paramedics with relevant medical data stored in CHAI:
- Household Coronavirus Status
- Covid-19 status of the individual
- Allergies
- Medication
- Past Medical History
- Next of Kin
If it is not a medical emergency, then you may consider calling the NHS’s non-emergency number:
1 1 1
Managing the Client List
Add a Client
A CHAI Group or Team Manager can add a client from the “Clients” Tab within the Managers Section and clicking the “Add a Client” button and follow the on-screen instructions.
Remove / Discharge a Client
A Team Manager can remove/discharge a client from their Team and a Group Manager can discharge them from all Teams.
Using the “Clients” Tab in the Managers Section , select the relevant client and then click on the crossed box on the right to remove them from a Team.
Readmit a discharged Client
A Client is considered discharged when they have been removed from one or more Teams but their record still exists and is still accessible to the Group.
To readmit a Client, a Team Manager or a Group Manager needs to find them add them to the relevant teams.
Step 1 – Begin Searching
Enter the CHAIhospice app and click on
the Search icon at the top of the page.
Step 2 – Search Details
You don’t have to fill all of the details in the search form, but the more information you use, the more likely it is that you will be able to pinpoint the correct client.
Step 3 – Choose the Client
After clicking the Search button, a shortlist of clients that match your search criteria will appear on the right. Click on the one you want to view.
You will be shown more details on that Client. You can easily switch to the other results on the left.
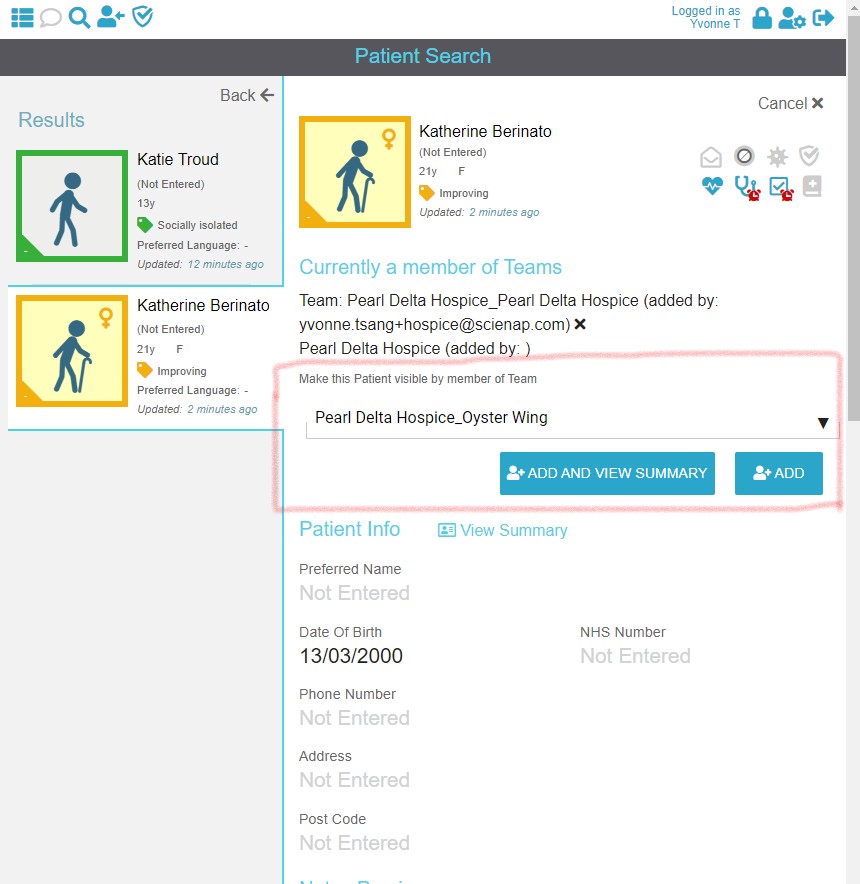
Step 4 – Choose a Team
When you have found the correct Client you can use the drop down menu (highlighted in the screenshot) to a select a team.
Step 5 – Add the Client
Click on one of the “Add” buttons.
“Add and View Summary” will take you directly to that Client’s Summary page after adding them to the selected team.
Step 6 – Create a copy of the original Admissions Record
Go to “Forms & PDFs” in the side menu and select the Admissions From. Scroll down and select print. Download the PDF.
Go to Patient Notes in the Client’s Summary Page. Create a note and attach the Admissions PDF.
Delete the downloaded PDF from your device.
You should do this before making any edits to the Client’s Admissions details since they will overwrite entries from the previous admission.
Delete a Client
A Group Manager can entirely remove a client and their record from the database by deleting them.
Using the “Clients” Tab in the Managers Section , click on the relevant client to view their details page and then click on the Delete Client button at the foot of the page.
Note: This action is irreversible.
If necessary, please ensure that you have an archived copy of the client’s record before continuing with this action.
Manage Your Account
Change your password
When logged into CHAI, to change your password click on the padlock icon in the top right hand corner of any page.
This will take you to the Change Password page where you can follow the instructions provided.
Recover your password
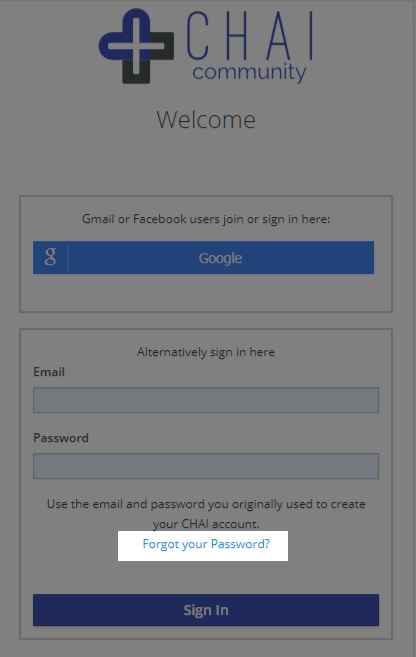
To reset your password use the link that is found on the CHAI Hospice login screen.
This will take you to the password reset instructions where you will be required to provide your user name and email address. You will be sent an email to complete the password reset.
Fix e-mail problems
The registration process involves your email verification. This is a simple process where we send you an automated email to confirm your address.
Unfortunately, our email can sometimes be blocked by spam blockers or other security systems that we all rely on. If you are expecting an email from us but it doesn’t arrive don’t worry! If this happens to you we can still get you onto CHAI but first try the following steps in order to see if you can unblock our emails:
Firstly, look in SPAM and other mail boxes.
If you find it there please move it to your Inbox and then follow the instructions in the email. Future emails should come straight to your Inbox, but if they don’t try also steps 2 and 3 below. You can test this by sending us an email as in step 2.Send us a test email
If you can’t find our email try sending us an email and this may help your email system recognise us. Send it to auto@chaicommunity.com and put “test” in the subject line. Also, if you can. add auto@chaihospice.com to your email contacts.You should get an immediate reply from us. If you do then you can proceed with the registration process by selecting the button to request another email from us (or simply start again).
Whitelist our emails
If you are still not getting a response to the “test” email then the next step is to “whitelist” our email (auto@chaicommunity.com) or domain (chaicommunity.com).
This sounds tricky but there is plenty of help available online and it isn’t too difficult. It is done slightly differently by each email system and so please search online for instructions (e.g. search for “how to whitelist email using gmail”). Now try sending the test email again to auto@chaicommunity.com with the subject “test”. If you receive a reply from us then you can go back to the registration page and request another registration email from us (or start the process again).
If all these steps fail then your CHAI manager (whoever invited you to join CHAI) will need to verify your account instead of us. Explain the problem to this person and ask them to give you a temporary password. It would be best if they gave it to you over the phone or by text rather than using the registered email address (for security reasons). This password will only last for 1 hr and you must immediately reset it before you can access CHAI. To use this once only password simply login here.
If you can, try and get some IT assistance from a friend or colleague to unblock auto@chaicommunity.com. We may occasionally use this email to inform you about matters concerning your CHAI account. If you still can’t get a reply from the “test” message then please notify your manager so they can forward any system messages that may be important to you. You can still use CHAI as normal, and this is not an uncommon problem and no reflection of your IT skills!
Make CHAI easier to use
Set CHAI Hospice as a Bookmark or Pin it to the home screen
What is a bookmark?
A bookmark is a web browser feature which allows their users to save a website’s address for future reference. After creating the bookmark you can usually reach the saved site within one or two clicks. This is particularly helpful if the addresses are long and difficult to remember.
Browsers will have their own way of handling these, so click one of these options to jump straight to the browser that’s most relevant to you:
Desktop Browsers
Create Bookmarks in Google Chrome
Displaying the Bookmarks bar
By default, Google Chrome doesn’t show the bookmarks bar so they will only be accessible via the “three dots” Menu icon in the top right.
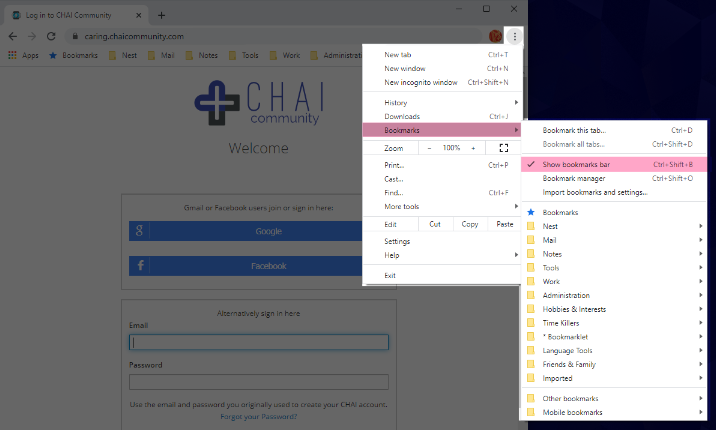
To enable the bookmarks bar, click on the “three dots” Menu icon, select “Bookmarks” and then select “Show bookmarks bar”.
Once enabled, the bookmarks bar will be shown beneath Chrome’s address bar, saved bookmarks will be displayed here.
Creating a bookmark
In Chrome, there are two ways to create bookmarks:
Method 1.
1. Visit your CHAI Hospice App.
2. Right-click on the bookmark bar and select “Add page…”.
Method 2.
1. Visit your CHAI Hospice App.
2. Click the Menu button, select ‘bookmarks’ and then select ‘Bookmark this tab’.
Create Bookmarks in Microsoft Edge
Creating a bookmark
1. Visit your CHAI Hospice App.
2. Click on the hollow star symbol at the end of the address bar.
3. You will see a menu that allows you to choose a folder to save the bookmark in.
Create Bookmarks in Mozilla Firefox
Creating a bookmark
- Visit your CHAI Hospice App.
- Click on the hollow star symbol at the end of the address bar.
Pin CHAI in mobile devices
Pin the page to an Android home screen
Creating a bookmark
- Launch Chrome and visit the CHAI Hospice App.
- Tap the menu button and tap “Add to homescreen”. You can edit the name for the shortcut and then Chrome will add it to your home screen.
The icon will appear on your home screen like any other app shortcut or widget.
Pin a page to iPhone, iPad, & iPod Touch device home screens
Creating a bookmark
- Launch the Safari browser and visit the CHAI Hospice App.
- Tap the Share button on the toolbar (rectangle with an arrow pointing upward)
- Tap the Add to Home Screen icon in the Share menu.